Difference between revisions of "Utility Tower"
Treadvisor (talk | contribs) (→Strategy: Updated section with some info.) |
|||
| Line 103: | Line 103: | ||
==Strategy== | ==Strategy== | ||
| − | The Utility Tower | + | Thanks to its environment, The Utility Tower is a dangerous place and can become a death warrant to those, who come unprepared. |
| − | The | + | The entire area is full of [[Cryogas]] and [[Frigid Environment]] will both reduce the player's cold resistance and threshold as well as increase cold damage taken, causing the gas to deal exponentially more damage. |
| − | The | + | First of all you need to have ways to counter all the effects of cold, that you meet here. The list of the gear, that can help with that: |
| − | + | * Armor with high cold resistance/threshold: | |
| − | + | ** [[Leather Armor]] made of [[Infused Bison Leather]] (makes you immune to [[Chill]]) with [[Insulating Foam Padding]] (makes you immune to [[Frozen|Freeze]]) - definitely shines here and is a must for '''Dominating''' difficulty. | |
| − | + | Other options are (sorted by descending of effectiveness): | |
| + | ** [[Leather Armor]] made of [[Bison Leather]] with [[Insulating Foam Padding]] | ||
| + | ** [[Leather Armor]] made of [[Infused Ancient Rathound Leather]]/[[Ancient Rathound Leather]] with [[Insulating Foam Padding]] | ||
| + | ** [[Lemurian Security Marine Armor]] | ||
| + | ** [[Protectorate Marine Armor]] | ||
| + | ** Any armor that uses [[Insulated Vest (component)|Insulated Vest]] in its blueprint. | ||
| + | * Headgear | ||
| + | ** [[Balaclava]] | ||
| + | ** [[Metal Helmet]] with [[Insulating Foam Padding]] | ||
| + | * Footwear | ||
| + | ** [[Boots]] made of [[Infused Bison Leather]]/[[Bison Leather]] with [[Insulating Foam Padding]] | ||
| + | ** [[Boots]] made of [[Infused Ancient Rathound Leather]]/[[Ancient Rathound Leather]] with [[Insulating Foam Padding]] | ||
| + | ** [[Tabi Boots]] made of [[Infused Bison Leather]]/[[Bison Leather]] | ||
| + | ** [[Tabi Boots]] made of [[Infused Ancient Rathound Leather]]/[[Ancient Rathound Leather]] | ||
| + | * Food items | ||
| + | ** [[Canned Fish]] - reduces all cold damage taken by 15% | ||
| + | ** Any other food, that increases [[Constitution]]. With [[Burrower Burger]] (+1 Con for 20 minutes) being the easiest obtainable. | ||
| + | * Other useful stuff | ||
| + | ** Lots of [[Coal]] and a [[Lighter]] to light those bonfires scattered around. Especially for '''Dominating''' where the Utility Tower becomes significantly harder, as [[Frigid Environment]] will stack even higher and more abruptly, and [[Warmed Up]] becomes impossible to stack past a certain level. | ||
| + | You can find quite a lot of coal in The Utility Tower itself, but it just can appear to be not enough. | ||
| + | |||
| + | Generally, characters with high [[Constitution]] and [[Conditioning]] will have an easier time getting through the Utility Tower because they will still block a percentage of the cold damage, as the resistance reduction only applies to armor. | ||
| + | |||
| + | The ice barriers have a high amount of damage threshold, thus it is advised to carry a [[Sledgehammer]] due to its ability to ignore damage thresholds. | ||
| + | |||
| + | The other radical mean of fighting off cold is using loads of [[Molotov Cocktail]]s together with some heat-protection gear. Just bear in mind, that this way you can unfreeze some unwanted enemies. | ||
== Map gallery== | == Map gallery== | ||
Revision as of 08:06, 4 September 2022
| Utility Tower | |||||
A soaring, abandoned, deep-frozen tower
| |||||
|---|---|---|---|---|---|

| |||||
| Location information | |||||
| Music | Unknown | ||||
| Located in | Upper Underrail | ||||
| Areas | Level 1 Level 2 | ||||
| Connections | Eos Complex | ||||
| NPCs | none | ||||
| |||||
Utility Tower is a location in Upper Underrail.
Description
It is accessible from the Eos Complex metro station in Upper Underrail. There's a ladder leading to it in the northwest storage room.
Zones
The Utility Tower is divided into various levels, each with its own segments from bottom to top.
Level 1
- 2 segments.
- The Frigid Environment stack limit is 5HD.
- The NE can be accessed with a 4 Agility passage, or by opening the door using the console in the room full of Coil Spiders.
- The path there is covered with CryogasD.
- The SE room:
- Is inhabited by several Coil Spiders and Greater Coil Spiders
- The console opens the door to the second level (by selecting the option "Access to H__ towwr")
- There is a hidden (need Perception) ventilation shaft in the north room which leads to area Level 2
Level 2
- 2 segments.
- The Frigid Environment stack limit of the 1st segment is 5H/10D.
- The Frigid Environment stack limit of the 2nd segment is 10H/20D.
- The south of the first segment contains a glitched console repeating various letters, with the only ones visible being "hypo".
- The northern room of the first segment contains frozen Coil Spiders and a room with 3 Greater Fusion Cells.
- The western room of the second segment contains frozen Death Stalkers and a trap door leading to Level 1.
Level 3
It is at this Level that ice starts blocking the path.
- 3 segments.
- The Frigid Environment stack limit of the 1st segment is 10H/20D .
- The Frigid Environment stack limit of the 2nd segment is 20H/30D.
- The Frigid Environment stack limit of the 3rd segment and outside is 20H/40D.
- The northern room of the first segment contains various rooms locked with valves. 1 (2 on Dominating) contains a frozen Ancient Rathound, blocking the way to a locker.
- The western room of the second segment contains frozen Death Stalkers.
- North of the 3rd segment there is a glitched console that repeats the words "thala, oth, thala, oth".
- The way to Level 4 is through the west room, which leads through a tunnel leading to the outside of the Utility Tower, where it is wind-blasted.
Level 4
- 3 segments.
- The Frigid Environment stack limit of the outside, 2nd segment and 3rd segment is 20H/45D.
- The Frigid Environment stack limit of the 1st segment is 5HD. (Bug?)
- The northern room of the 2nd segment:
- Contains a room with 3 valves opening each room, which are blocked by ice.
- Is likely bugged as it is wind-blasted despite not being outside.
- The south-eastern section of the 3rd segment contains a breach in a boiler in which there is a Plasma Core.
- South of the 3rd segment there is a glitched console that pulsates with tiny letters, mus and an upside-down 4. There is also a box near it that contains the Breathing Tank Regulator oddity.
- The western room of the 2nd segment contains various shelves and containers blocked by ice.
- The 2nd segment is where Ghost Crawlers and Coil Spiders start appearing.
Level 5
- Saving is disabled.
- 2 segments (3 on Dominating, conditional).
- The northern room of the 2nd segment:
- Contains valves which open rooms full of empty lockers.
- There's a line on the floor connecting some of lockers. If you open them and only them then the last one gives you some items, most notably two doses of Regenerative Mixture.
- Contains a vent shaft that leads to Level 1's vent.
- It is one-way, the player will not be able to climb back up through it.
- Contains valves which open rooms full of empty lockers.
- South-west of the 2nd segment there is a fireplace that when lit will allow you to interact with a Frozen Corpse that will give the player the Warm Trapper Hat.
- On Dominating the third segment will unlock, containing Strange Ice that will initiate the boss battle with Demise.
- After the dungeon boss is defeated a new restless corpse will appear near the elevator shaft that takes the player all the way down to the first level that contains the Antifreeze Protein Injector oddity.
Boss Battle
The boss battle is only accessible on Dominating and if you have received an email at the start of the game mentioning "Ice T", making it mutually exclusive with the Arena Masters.
| Spoilers |
|
Enemies and other hazards
- There is a constant Frigid Environment debuff in that area, making you more vulnerable to cold.
- The maximum amount of stacks increases the higher you go, and you also lose Warmed Up stacks depending on difficulty and how high you are, eventually making it impossible to stack it on Dominating. It will also start adding up to 5 stacks of Chilled at about 20Verify stacks.
- A lit fireplace will remove 10 stacks of Frigid Environment every turn.
- The Frigid Environment limit on Hard is 20, while on Dominating it's 45.
- Fireplaces will extinguish faster the colder the area, depending on levelVerify or ambient Frigid EnvironmentVerify.
- All of the enemies above Level 1 are frozen and there's no need to fight them, but do take note that setting the fireplaces near them on fire will unfreeze them.
- Certain areas on the higher levels are wind-blasted, and will deal a serious amount of cold damage every turn spent there, which can quickly become fatal when combined with Frigid Environment.
- Ice Barriers become more and more common, which will block the way forward and have to be destroyed to proceed.
- Ghost Crawlers and Coil Spiders that inflict Shattered Will debuff (upper levels).
Strategy
Thanks to its environment, The Utility Tower is a dangerous place and can become a death warrant to those, who come unprepared. The entire area is full of Cryogas and Frigid Environment will both reduce the player's cold resistance and threshold as well as increase cold damage taken, causing the gas to deal exponentially more damage. First of all you need to have ways to counter all the effects of cold, that you meet here. The list of the gear, that can help with that:
- Armor with high cold resistance/threshold:
- Leather Armor made of Infused Bison Leather (makes you immune to Chill) with Insulating Foam Padding (makes you immune to Freeze) - definitely shines here and is a must for Dominating difficulty.
Other options are (sorted by descending of effectiveness):
- Leather Armor made of Bison Leather with Insulating Foam Padding
- Leather Armor made of Infused Ancient Rathound Leather/Ancient Rathound Leather with Insulating Foam Padding
- Lemurian Security Marine Armor
- Protectorate Marine Armor
- Any armor that uses Insulated Vest in its blueprint.
- Headgear
- Footwear
- Boots made of Infused Bison Leather/Bison Leather with Insulating Foam Padding
- Boots made of Infused Ancient Rathound Leather/Ancient Rathound Leather with Insulating Foam Padding
- Tabi Boots made of Infused Bison Leather/Bison Leather
- Tabi Boots made of Infused Ancient Rathound Leather/Ancient Rathound Leather
- Food items
- Canned Fish - reduces all cold damage taken by 15%
- Any other food, that increases Constitution. With Burrower Burger (+1 Con for 20 minutes) being the easiest obtainable.
- Other useful stuff
- Lots of Coal and a Lighter to light those bonfires scattered around. Especially for Dominating where the Utility Tower becomes significantly harder, as Frigid Environment will stack even higher and more abruptly, and Warmed Up becomes impossible to stack past a certain level.
You can find quite a lot of coal in The Utility Tower itself, but it just can appear to be not enough.
Generally, characters with high Constitution and Conditioning will have an easier time getting through the Utility Tower because they will still block a percentage of the cold damage, as the resistance reduction only applies to armor.
The ice barriers have a high amount of damage threshold, thus it is advised to carry a Sledgehammer due to its ability to ignore damage thresholds.
The other radical mean of fighting off cold is using loads of Molotov Cocktails together with some heat-protection gear. Just bear in mind, that this way you can unfreeze some unwanted enemies.
Map gallery
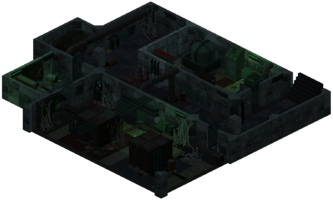
Level 1
- Dun up it2.png
Level 2

| |||||||||||||||||||||||||||||||||||||||||||||||||||||||||||